Tag Archive for: Valhalla Provincial Park

New 5.10a Route in the Valhallas is a Monster

This summer professional photographer Steve Ogle and I climbed a new route up a beautiful swath of virgin slab in Valhalla Provincial Park near Cahill Lake. These are the details.

There’s a giant south-facing slab that can easily be seen from Highway 6 north of the village of Slocan before the S-bend that takes you over Enterprise Creek. It’s impossible to judge from that distance just how large it is but after a recent adventure Steve Ogle and I can now confidently attest to the fact that it’s really, really big. And in 30+ heat, it’s really, really hot.

In August we paddled from Slocan to Evans Creek and then hiked the three hours up the relatively mellow Beatrice Lake Trail. (The only real steep part of the hike is at the beginning as you rise out of the mouth of Evans Creek.) We passed the aptly named Emerald Lake, encountering another short steep hiking section up from its west end, to Cahill Lake in Valhalla Provincial Park. Our objective was the face of a large dome of gneiss on the north shore of the lake that’s backed by the sub-peaks of Hela Peak. It’s a stunning piece of white rock that’s easy to access from the campground at the west end of Cahill Lake. The same day we hiked in we did a recon mission to the base of the wall, scoped a line, stashed some gear, and went back to camp to rest before the next day’s push.

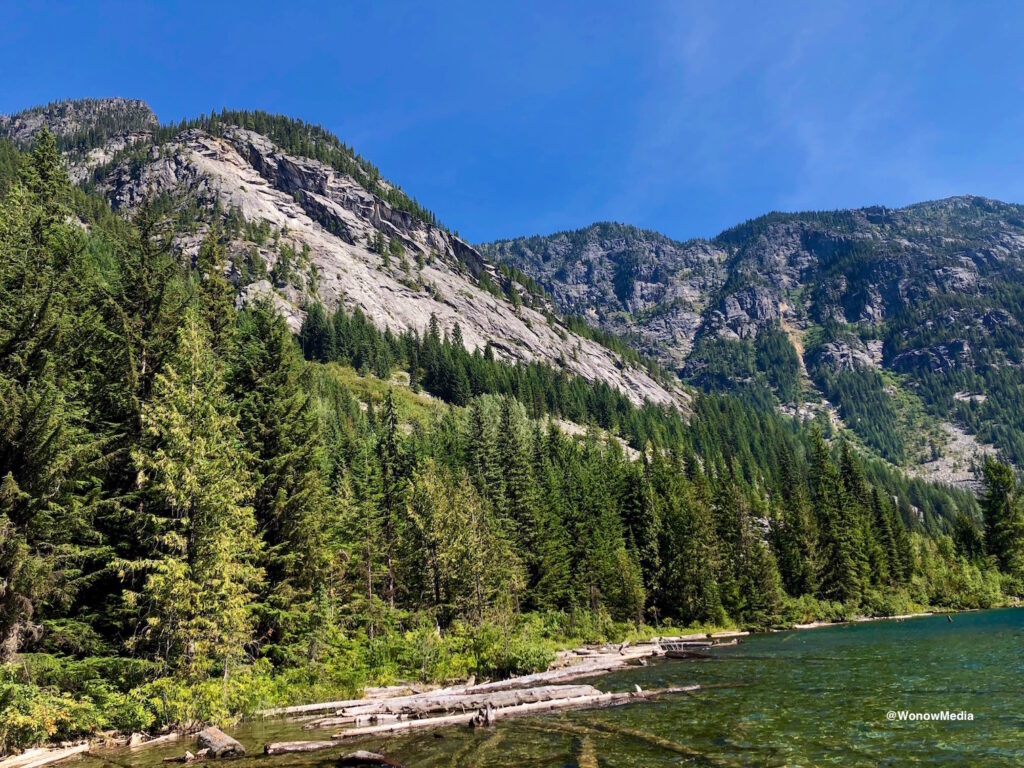
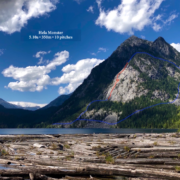
Hela Monster as seen from the Cahill Lake campground.

The next day proved to be a bit longer and hotter than expected. In hindsight, Steve dumping a half litre of water at the start of the route because it was too heavy wasn’t the best idea. Nor was leaving one headlamp at camp. By the time we reached pitch 5, bolting the occasional blank section on lead, the temperature had climbed above 30°C. Luckily there were intermittent clouds but it wasn’t long before I was sucking on the lid of my chapstick trying to trick my brain into believing there was moisture in my mouth. Another five pitches took us near top just as the sun was starting to set. We ate wild blueberries on the fly, savouring the minuscule amounts of moisture they provided, and then stumbled down talus for 1.5 hours using one headlamp and the light from a cellphone, before reaching an unnamed creek where I consumed about three litres of water in 10 minutes. We walked back into camp 15 hours after setting out, toasted the new 10-pitch route with scotch, and collapsed.

Despite our challenges, I highly recommend this climb for those who want an adventure in a beautiful setting up easy slab. There’s only one 5.10a move on the whole route and it’s protected by a bolt. The rest of this monster climb is mostly in the 5.5 to 5.7 range, although you’ll want to be comfortable running out easier sections of slab as gear can be sporadic in places. Oh, and pick a day that’s not super hot.

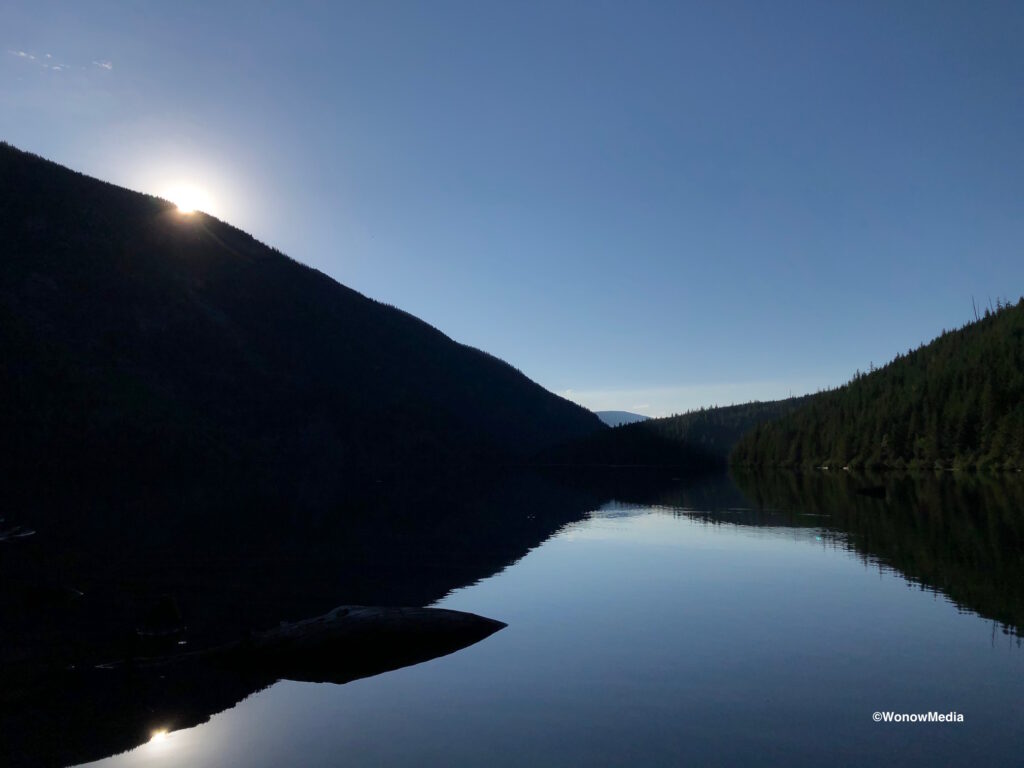
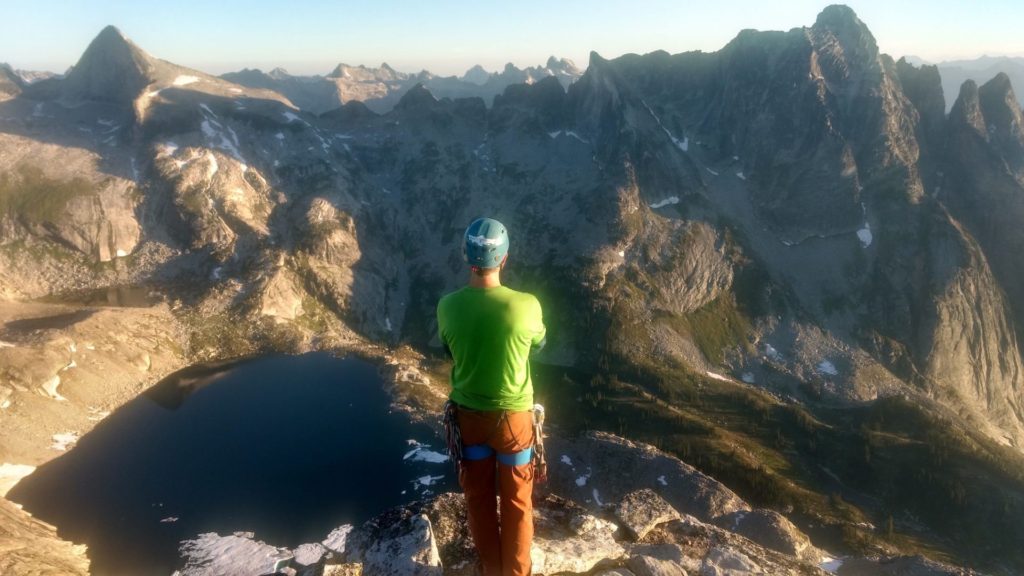
Cahill Lake photographed the morning after the first ascent of Hela Monster.

Hela Monster Route Description

Hela Monster • 5.10a • 350 metres • 10 pitches • South-facing • FA: Steve Ogle, Vince Hempsall August 2020

About The Route Name

Hela is a prominent peak in Valhalla Provincial Park named for the Norse goddess Hela (aka Hel) who is the daughter of Loki and giantess Angrboda and who presides over the realm of the dead. Her appearance is described as half blue and half flesh-coloured, which is appropriate given the views from the route, which include the stunning blue lake and the pasty Slavic-white skin colour of the rock. A Gia Monster (pronounced “Hila Monster”) is one of only two poisonous lizard species in North America, which is also appropriate given this route has bite when you’re climbing it in 30+ heat, like we did.

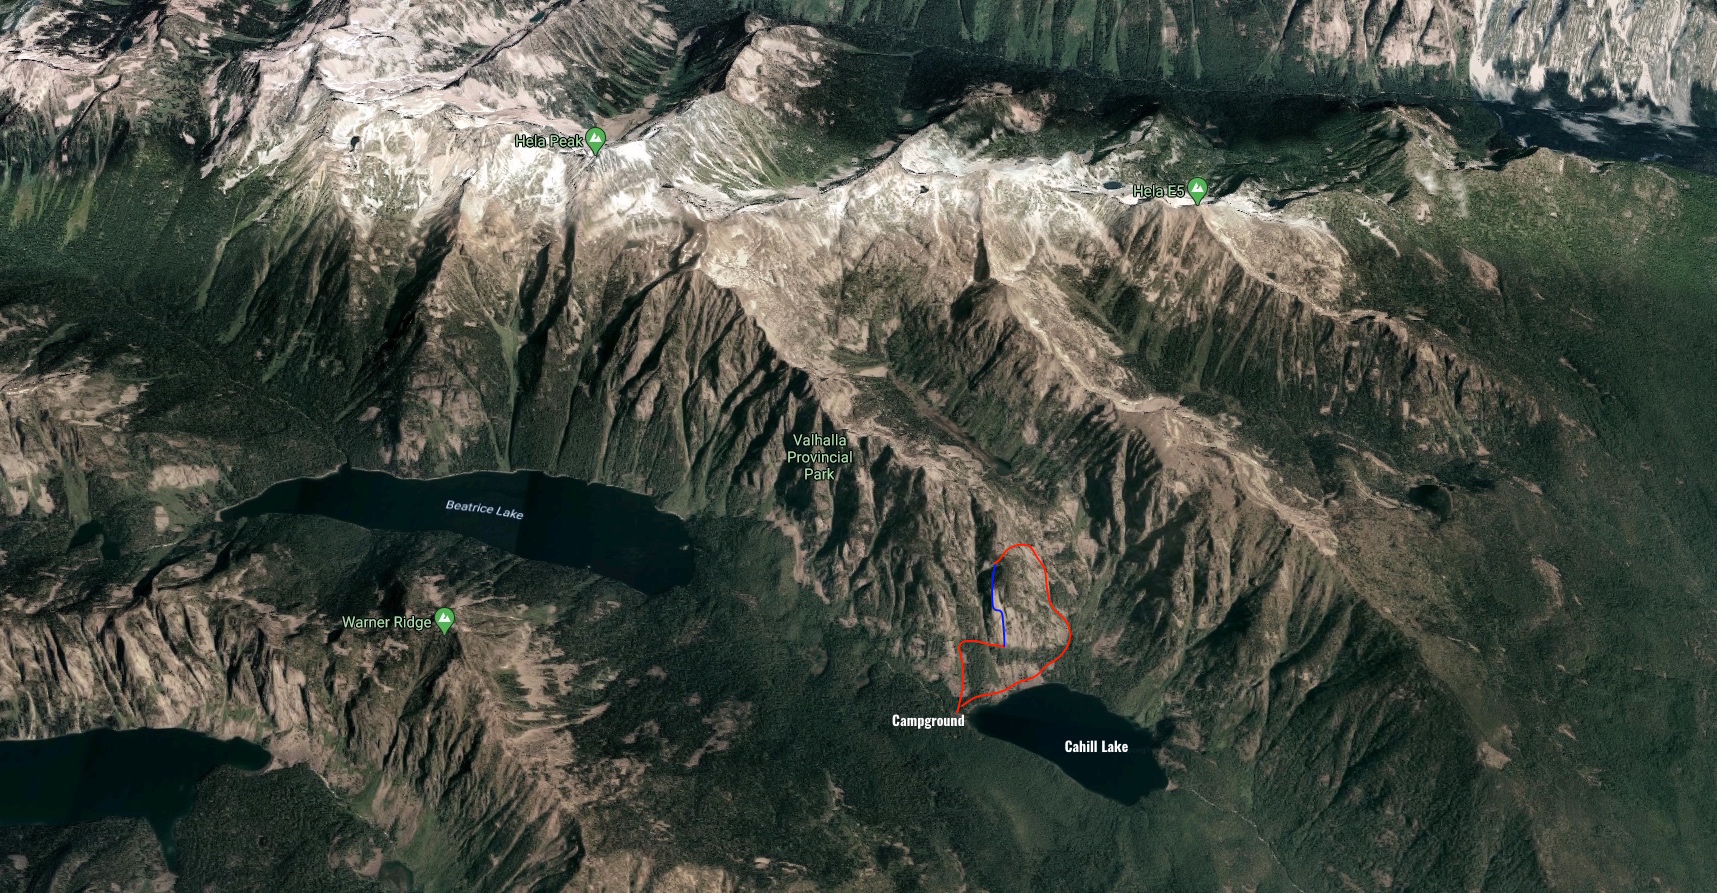
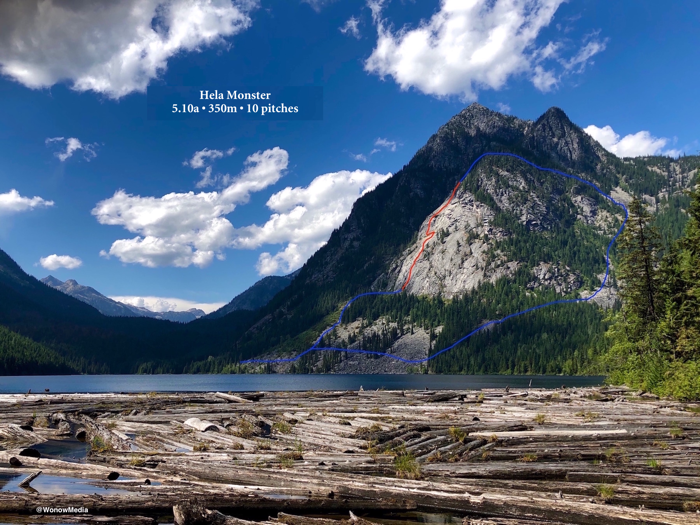
A Google Map topo of the route in blue and the approach and walk-off in red.

About The Climb

Hela Monster is located on a huge slab of granitic gneiss that is solid, textured and clean, except for where dirt has gathered in the cracks. The climbing is mostly in the 5.5 to 5.7 range. Route finding is very easy thanks to all the bolts but protection is sparse on some of the easier terrain. All crux moves are protected. Most stations are bolted but those that do not have either trees or boulders that can easily be slung.

History Of The Area

Slocan Lake and Evans Creek were important fishing grounds for multiple First Nations throughout the centuries as evidenced by the pictographs on the lake’s west shoreline between Slocan Village and Evans. In the 20th Century this area became a hotbed of mining and logging – in fact, the tiered lake systems from Beatrice to the Slocan were flooded and then released so as to move timber down the drainage. The Beatrice Lake hiking trail is an old logging road and there’s still a lot of evidence of the old camps, from rusted cans to rotting machinery. Today the popular hiking trail leads you into Valhalla Provincial Park, which was established in 1983.

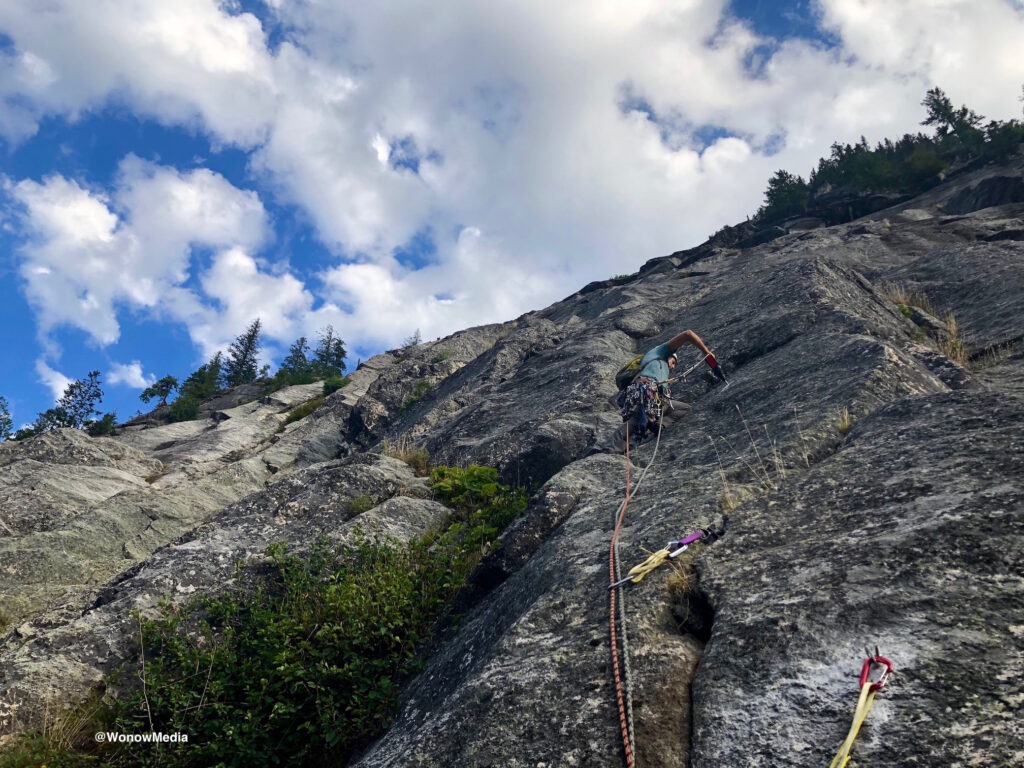
Steve Ogle enjoying bolting on lead for the first time while on the first pitch of Hela Monster. Huge props to Jeff Hammerich for the loan of the drill.

The Approach

From the village of Slocan, boat or hike the 8km trail to Evans Creek Campground. From here, hike the Beatrice Lake Trail 8.5km (800m of elevation gain) past Emerald Lake to Cahill Lake where you’ll find a campground at the west end with six tent pads, an outhouse, and a metal food box. You can see the route from here as it follows the prominent white streak that runs down the slab from the top corner system which is stained brown. The route starts just to the looker’s right of the white streak, next to the lone tree at the bottom of the face. The tree has branches on only one side. From the campsite walk north over the small tributary (it’s easy to cross via logs or boulders) and then veer northeast towards the scree slope. Walk the scree, diagonally up and east until you reach the first line of conifers. To avoid excessive bush-bashing, walk up the scree slope from here until you reach the base of the wall. Follow it east until it slopes back down and you’ll see the tree at the start of the route. Scramble up the grassy gully and then up to the ledge the tree resides on. You’ll see two bolts on the wall directly above you.

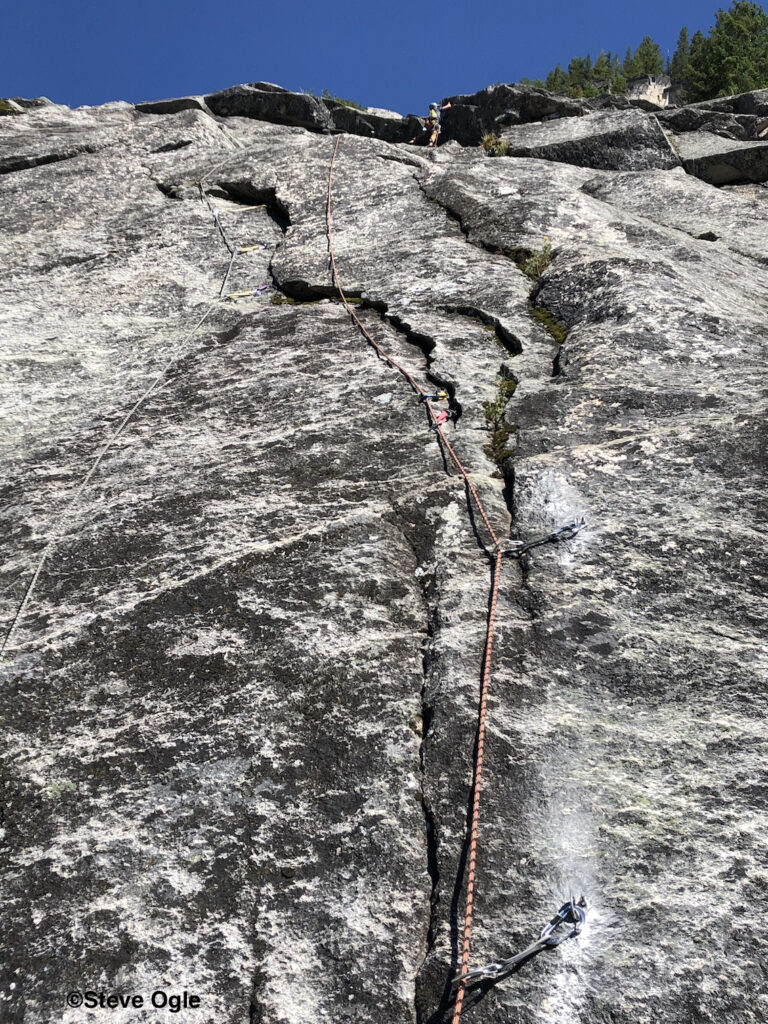
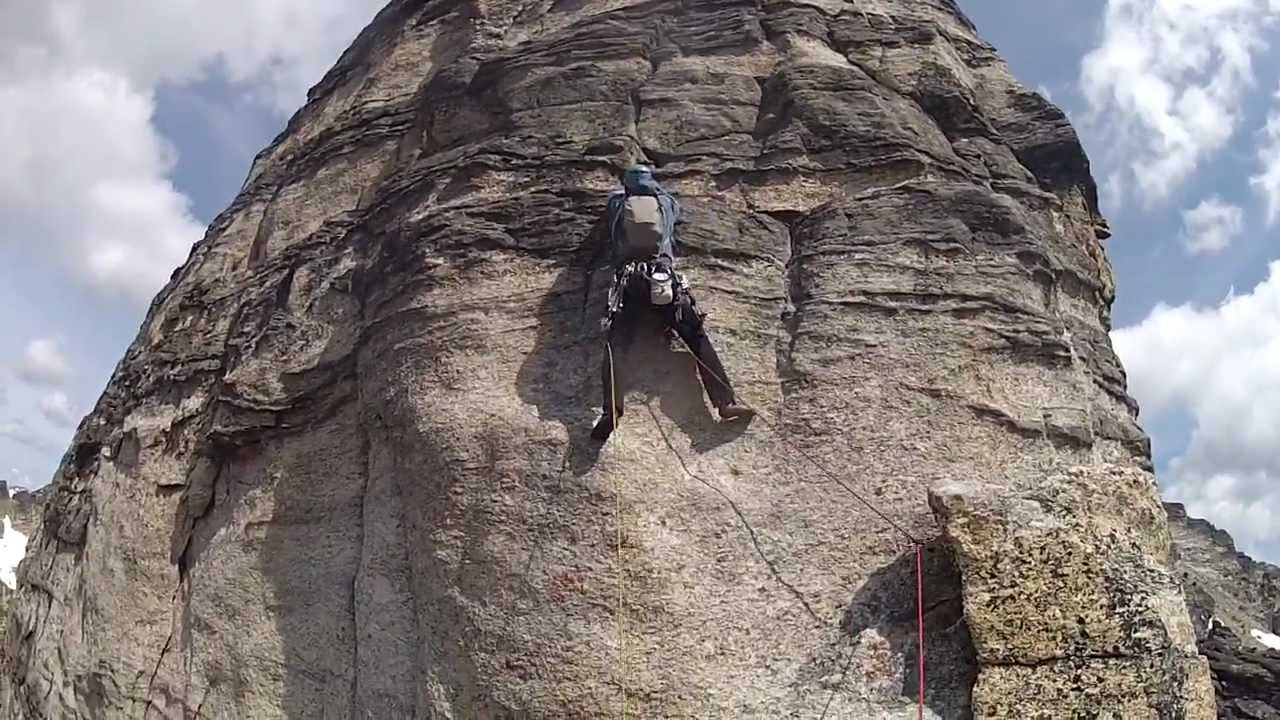
Vince on the crux move of the second pitch of Hela Monster.

The Gear

Take a standard rack to 2” plus doubles of .75 and 1.0 and a rack of nuts. Both climbers should have a nut tool to dig dirt out of cracks for protection if required. Also take 14 draws including 6 extendable ones. One 60-metre rope is all you need if you’re planning to walk off. Take two 60-metre ropes if you want to rap. Be aware rapping is not recommended, however. See descent description below for more info.

Steve questioning the decision to dump water at the start of the route to save weight as the day’s temperature rises past 30°C.

Pitch Descriptions

Start Location: 49°52’01.5” N 117.33’06.7” W

P1 (58m 5.7): Start at the tree and pass the two bolts. Trend left using sporadic gear and pass three more bolts to finish at a bolted station on a small ledge just below a larger grassy ledge at 58m. There’s one 5.7 move off the deck but otherwise this pitch is in the 5.6 range. 5 bolts

P2 (58m 5.10a): Climb past two bolts then follow the flake, laybacking and jamming through 5.8 terrain until you can step over to easier ground. Continue up, aiming for the V-shaped notch that is past a big left-facing dihedral. Pull a mantle move over the roof, which is protected by a bolt that can only be seen once you’re at the roof. This is the only 5.10a move on the route and can easily be aided. Continue another 10 metres past an additional bolt to a station. 4 bolts

P3 (45m 5.6): Move up a wide corner and then either step left to the arete or continue up the corner. Past this feature is an easy section of slab climbing where protection can be found by the large block to the right if needed. Gain the large ledge and find a two-bolt anchor to the left of a bushy gully.

P4 (58m 5.6): Go directly up a seam and two overlaps, continuing slightly left above to gain more cracks with sparse but adequate protection. Finish on the twin cracks to the right of a whale-like feature and belay by slinging the lone ottoman-sized white boulder.

P5 (30m 5.2): Scramble up low fifth-class terrain to gain a huge ledge that slopes downward slightly to the left. The bolt anchors are about 20m left from where the scramble meets the ledge.

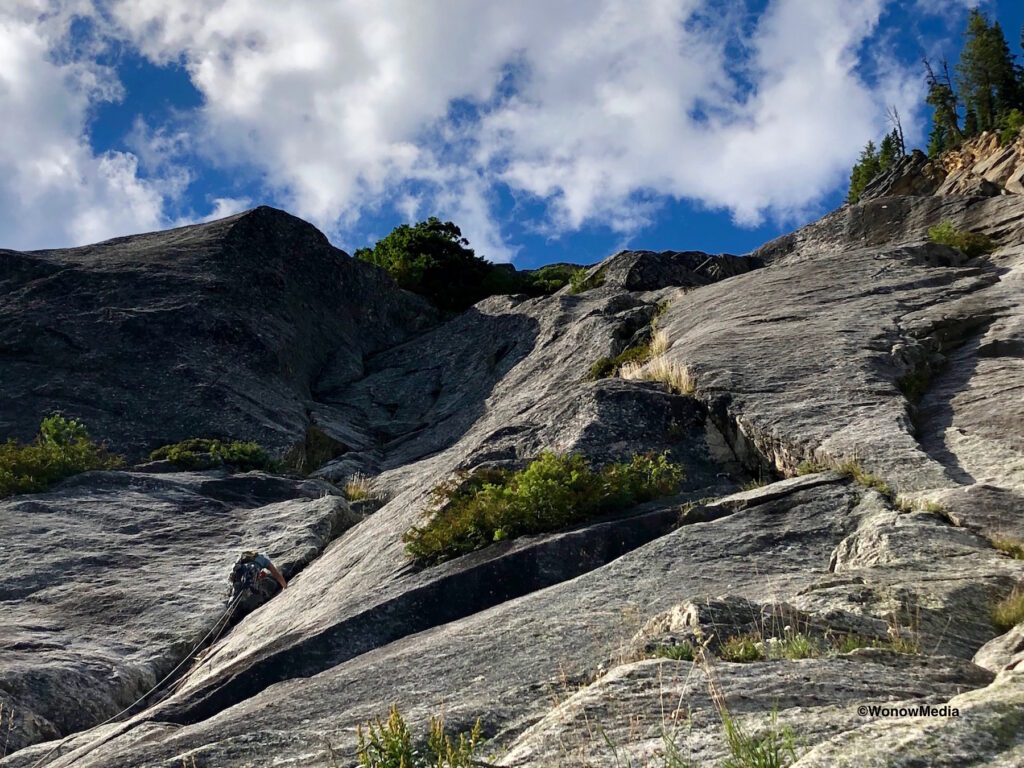
Steve leading the excellent 6th pitch of Hela Monster.

P6 (60m 5.8): From the anchor angle up and left over fourth class terrain (no protection) to gain a broad V-shaped crack system that trends up and left into a right-facing dihedral. Belay from the ledge at a two-bolt anchor at the top of the dihedral.

P7 (60m 5.5): Continue up straight, skirting below and to the right of a large bunch of bushes and trees. Then angle slightly right and up through easy terrain. Aim for an area approximately 10 metres to the left side of a large sloping roof. Belay at a very small tree with a good-sized root ball with a fixed sling.

P8 (58m 5.8): Climb easy terrain and then left onto mellow slabs. There is a bolt in a more blank section of rock at around the 40m mark. Continue left past the bolt and follow a small seam with one small gear placement. Finish up on a ledge with darker rock where there’s a two-bolt anchor. 1 bolt

P9 (60m 5.2): Move up and left over easy ground then walk on the moss-scattered ramp skirting below the treed cliffs as far as you can reach to a fir tree. Sling this and belay.

P10 (60m 4th class): Continue walking uphill and to the right across pine needles, over blocks and around trees until you reach easier ground at the 60m mark. Belay from whatever you can sling. From here it’s an easy walk to the height of land but be careful not to veer too far right towards the cliffs.

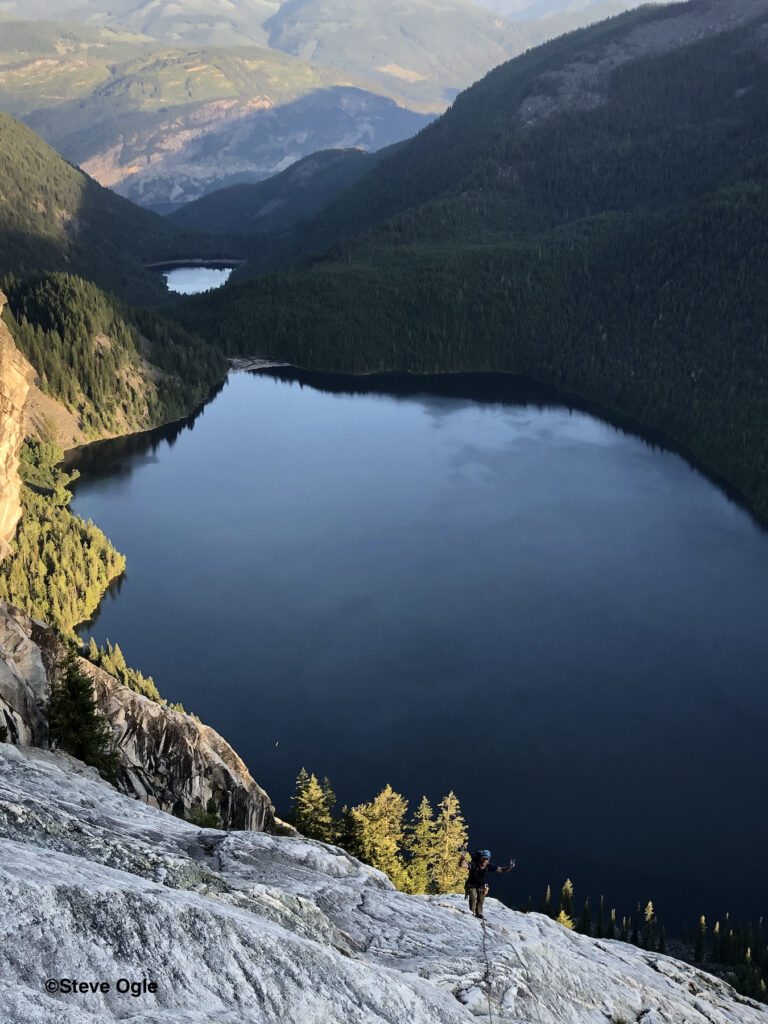
Vince enjoying the relatively mellow terrain of Pitch 8 above Cahill Lake.

The DESCENT

It took the first ascentionists two hours to walk back to the campsite and some of that time was spent in the dark. From the top of pitch 10, continue hiking east up mellow terrain to where the ground flattens out. Once there, walk in a north-east direction past wild blueberry bushes and conifers. Although you’ll be trending slightly downhill, it’s important to stay relatively high as most of the south-east slope cliffs out. Eventually you’ll reach a scree slope that you can follow down, first east and then it swings around south and a creek is on your left. Keep walking towards the lake and when the scree ends, trend southwest through the trees (this is the only heavy bushwhacking you’ll have to endure) to gain the scree slope below the south face of the slope you’ve just climbed. Stay approximately 80 metres above the lake edge for easier walking. Rappelling the route is not recommended because it’s so low angle and the chances of getting your rope stuck are high. However, if you get stuck and need to rappel, remember that all pitches require two 60m ropes. You’ll have to sling trees at the top of P10, P9 and P7 and make an awkward diagonal west-to-east rappel from the anchors at the bottom of P5 to the ottoman-sized boulder at the top of P4. From there rappelling to the base of the route becomes easier.

Here’s a downloadable PDF of the route information for Hela Monster: hela monster full description

A few weeks after the first ascent, Greg Amos and two others climbed the route and provided some feedback on the pitch descriptions. Big thanks to them. Also, they recorded their route and have a KMZ file available. Comment below if you’d like a copy of it.

Helheim Rock Guide Updates

There’s a new rock climbing area on Bannock Forest Service Road in the Slocan Valley thanks in part to the efforts of valley resident Daren Tremaine with help from Jason Hartley and Albertan Marcus Norman. The area, which they’ve named “Helheim,” boasts steep lines on two, 20-metre-high boulders, which are made up of a type of gneiss that’s reminiscent of limestone. It’s a great spot for hot summer days as it’s completely shaded. Alternatively, some of the steeper routes can be done in the rain. Be warned, however, that it’s a popular spot for mosquitos in the late Spring so bring bug dope if climbing here in June. To access the area, follow the directions for Gimli Peak on page 143 of the West Kootenay Rock Guide. Once you turn onto Bannock Forest Service Road set your odometer to zero. You’ll cross a bridge, navigate through two deep water bars and when your odometer hits 1.3 kilometres look for the orange flagging tape on the poplar on the left (south) side of the road. If you have a low-clearance vehicle, park at the large pullout on the left of the road before the first water bar. (In fact, this is a good pullout for all vehicles as there’s very little room to park on the road closer to the crag.) From this spot Helheim is an easy 300-metre walk up the road. The rough access trail to the crag is about three metres downhill (east) of the flagging tape. Step off the road and down a steep bank then follow the trail for about 100 metres until it reaches the western most point of the west boulder. Follow the trail to the left (north) where you’ll find a flat area that’s great for dumping your gear and allowing young kids to play. The first climb you come across is the steep “Hela Monster.” The east boulder is just past this and harbours the majority of climbs. All routes are sport, all have anchors and a 50-metre rope is required. Members of TAWKROC and Wonow Media have only been on a few of these routes, therefore the following descriptions are mostly from Daren. Descriptions start at “Hela Monster” and then follow a clockwise direction around the boulders. (Daren’s original topo had the routes listed from East to West – see if you can figure out the word play on some of the route names.)

Project – The first route you come to when approaching via the trail. It goes up the super steep arête on the north-east corner of the West boulder. Marcus has requested this remain a closed project until he gets it. Not that he need worry as there aren’t a lot of 5.14 climbers in the area.

Hey Yo! Sediba Man 5.10c —This route starts on the west face of the east boulder and traverses left through a line of pockets to the arête. The upper slab ain’t a gimme. (D Tremaine 16)

Sediba Left 5.11a — A bouldery start to “Sediba Man.” Grab the quartz crimper and traverse right after the first bolt to avoid the scaly rock. A long draw on the third bolt is helpful. Continue up the arête through the tricky slab. (D Tremaine 17)

The Fuzzy Bucket 5.11b — Named for the mossy jug at the start of the route, which has since been scrubbed clean and is now a bucket with a brazilian. This route boasts a few stacked boulder problems and three people had a hand in its construction including Daren, Gary Parkstrom and Ryan Johnstone. (R Johnstone 15)

In Buckle Boots 5.11a — The line up the centre of the East Boulder’s North face. This route also had a bomber hold with moss in it but it too has been shorn.  Save some jam for the crux move at the top. (J Hartley 18)

The Lazy Dog 5.10b — Follow the obvious flake that starts near the east side of the face and then finesse through the steeper wall above. (J Hartley 15)

Jumped Over 5.11d — The easiest way to get a taste of the prow. Start as for “The Lazy Dog” then step left at the roof and when things start getting too technical, head back right to the last bolt on “The Lazy Dog.” (D Tremaine 16)

Brown Fox 5.12a — Follow “Jumped Over” but stay left near the top until you’re perched on the arête at the summit of the prow. (D Tremaine 16)

The Quick 5.12+ — This route lays it on from start to finish. A series of big pulls leads to a fingery, slopey traverse and a balancey finish on the arête. The slopey edges to the right of the last bolt are in, but if you traverse all the way onto “The Lazy Dog,” then you’re a lazy dog. (D Tremaine 17)

Helgrindr 5.13a — High-quality climbing that Marcus says will soon to be an area test piece. After an easy start the action gets going with a step-up dyno. A selection of bad holds guards the finishing arête. (M Norman 17)

At Precisely 12 o’clock 5.12a — Practice your heel hooks and knee smears for this one, which is found on the eastern-most route on the face. You can start as for Helgrindr and then move right to the arête but the more aesthetic line is to start on the left below the small roof. Follow the knife-edge arête and hang on for the lip traverse. Stepping left onto the slab by the fourth bolt invites public shaming. (D Tremaine 16)

The next two routes are located on the shorter south face and are reached by walking in a clockwise direction for about 10 metres from “At Precisely 12 o’clock.” They’re located to the right of the obvious, narrow chimney.

BJL Direct V3 — You can top rope this one off the chains for “BJL” or you can boulder it although this highball problem isn’t without consequence. There’s a crux getting off the ground and another on the upper slab. Start just left of the arête on the side pull. Hit the slopey pod, then a jug. Top out on the same tricky slab that completes BJL. (D Tremaine 16)

Bill, John and Lisa 5.10c — This route boasts a surprisingly hard start which then leads to a fun traverse on great holds. Start at the bottom of the obvious chimney (the log that’s there has become a much appreciated feature, but the route does go without it) and then trend right through the wacos. Save some juice for the top slab because it ain’t over at the lip. (D Tremaine 16)

The next three routes are located on the short west face of the east boulder toward the south-west corner. The easiest way to get to them is from “BJL”: walk in a clockwise direction from the chimney until you reach the obvious two-metre-wide gully between the west and east boulders. Step into the gully and you’ll notice a line of bolts on the right (east) wall. This is “Down The Rabbit Hole” and the two routes on either side of it can either be done on top rope or as boulder problems. (Note that the landing here is not great, however.)

Black Rabbit 5.10 top rope — Top rope the line to the right of the bolts by using the directional and the anchor of “Down The Rabbit Hole.”

Down The Rabbit Hole 5.10b — Follow the line of bolts. This was meant to be an easy way to the top of the boulder that avoided the chimney grovel but it turned out to be harder than it looks.

White Rabbit 5.9 top rope — Top rope the line to the left of the bolts but using the directional and the anchor of “Down The Rabbit Hole.”

For more written descriptions and updates of other areas in the West Kootenays, download the West Kootenay Rock Guide updates.

Two Climbers Circumnavigate the 13 Peaks of Mulvey Basin in a Day

Dave Lussier photo

On August 22, 2017, David Lussier and I successfully completed a circumnavigation of Mulvey Basin in Valhalla Provincial Park, bagging all 13 peaks. I wrote a story about it for Mountain Culture Group. This is how it starts:

The headlamp beam glared off the white surface of the golf ball, forcing me to squint to make out the black cursive lettering: “Miracle Flight+ 2”. Appropriate considering we’d need some good fortune to complete the mission we had just embarked on. I placed the ball back on the rock where I found it beside its twin and a golf club and finished hiking the 20 metres to the summit of Mount Dag, one of the tallest peaks in the Valhalla mountain range.

It goes without saying a nine iron and two golf balls are strange items to find on top of any mountain peak. But the fact it was 2:30 in the morning and my climbing partner, and mountain guide, David Lussier and I were embarking on a quest to traverse 13 peaks of the Mulvey Basin in under 24 hours, made the discovery even more surreal.

This was our second attempt of this traverse in as many years and the forecast was perfect: clear skies with zero percent chance of precipitation. Then again, good weather was predicted for our first attempt in 2016 and that ended with us cowering under a boulder during a freak electrical storm at 8,500 feet.

As David signed the register on the summit of Dag, I continued thinking of my bizarre discovery. Why a nine iron? Why not a driver? Surely that would be a lot more satisfying. I imagined teeing up and driving a ball across the two-kilometre-wide span that separated us and Gladsheim Peak, the final destination of our mission. Suddenly all thoughts of golf vanished as David asked, “You ready?” He had replaced the register in its waterproof canister, slotted it back in the stone cairn and was looking at me expectantly. It was time to descend from the summit, collect our bivouac gear and start the 12-kilometre circumnavigation of Mulvey Basin: 13 peaks, eight of which we’d have to rock climb, and over 2,300 metres of elevation gain. At that moment, I wished I could’ve just soared over to Gladsheim as well.

To read the rest of the adventure tale, visit mountainculturegroup.com/mulvey-basin-circumnavigation-in-a-day.

Anatomy of an Epic

It seems only fitting that the day I celebrated my 37th year on earth was also the day I learned some of life’s most valuable lessons about surviving on said earth. For example: pay attention to the sky.

We were 750 feet up a rock climbing route called “Lusting After Women” on Mt Gimli in British Columbia’s Valhalla Mountain Range and we were gawking at the beautiful sunset – not because we cared one iota about the stunning colours but because we still had 300 feet to the summit. “What the hell time is it?!” I said to my climbing partner. We had no idea but it was obvious what was supposed to be a six-hour romp up an easy route had quickly gone sideways thanks to cold hands, dodgy route finding and challenging rope management. We had left behind watches and ignored the sun’s position all day. Now we were faced with climbing the rest of this mountain in the dark. And we had only one headlamp between us.

Which brings me to the second valuable lesson about survival: be prepared. As cliché as this boy scout axiom is, it’s true. Whether you’re driving over the Salmo-Creston pass or climbing in remote wilderness areas, bring a source of light. No, not a Bic. (Although that comes in handy too.) You want a real source of luminescence like a flashlight or headlamp and fresh batteries. Petzl has a tiny, yet powerful, emergency headlamp that retails for about $30 and will easily fit into your first aid kit so you’ll never forget one again. (You did bring your first aid kit right?) Check out a review of the Petzl e+Lite.

A few other items that you want to carry with you at all times when rock climbing in the Valhalla Mtn range are: gloves, a warm, waterproof jacket, a toque, sunscreen, and an emergency foil blanket. Oh yeah, and carry lots of water. No matter how heavy you think two litres of water is, hump it up the cliff with you. That day on Gimli, we ran out of water on the summit and faced a grueling 4-hour descent back to the car feeling lightheaded from dehydration. We were so punch drunk by the end of the descent we were literally bouncing off trees before falling face-first into the stream near the car-park.

Upon returning home 16 hours after we had set out, I learned another valuable lesson: always tell someone you trust about your trip and have a back-up plan in case things go awry. In my case the RCMP had been called (keep in mind we were 7 hours overdue) and a buddy of ours was loaded up and prepared to drive to the trailhead to make sure we weren’t mauled by a bear or something. Now that’s friendship! Is there someone willing to do that for you? Consider it because the RCMP won’t dispatch Search and Rescue until daylight and by then you might have lost the tug of war over your arm with that badger.

After all the drama, the pain and the suffering though, I can honestly say the most important lesson I learned on my 37th birthday in the mountains is…go to the mountains. We summited Gimli under one of the most beautiful, star-filled skies I’ve ever seen and were rendered speechless when an orange half-moon rose from behind the neighbouring peaks. “This is what it means to be alive,” I said before we began the descent down. “Happy Birthday to me.”

Have more suggestions about what to bring in case an alpine day trip goes epic? Send them to info@wonowmedia dot com and I’ll post them here.

Amazing Gimli Peak Video

Feast your eyes on this great video of the classic South Ridge climb on Gimli Peak in the Valhalla Mountain Range. It was put together by photographer Paul Lapides and it documents his ascent of the route in July 2012. For more about Paul’s adventure check out the Paul Lapides Blog.